Cart
0
Complete Your Setup
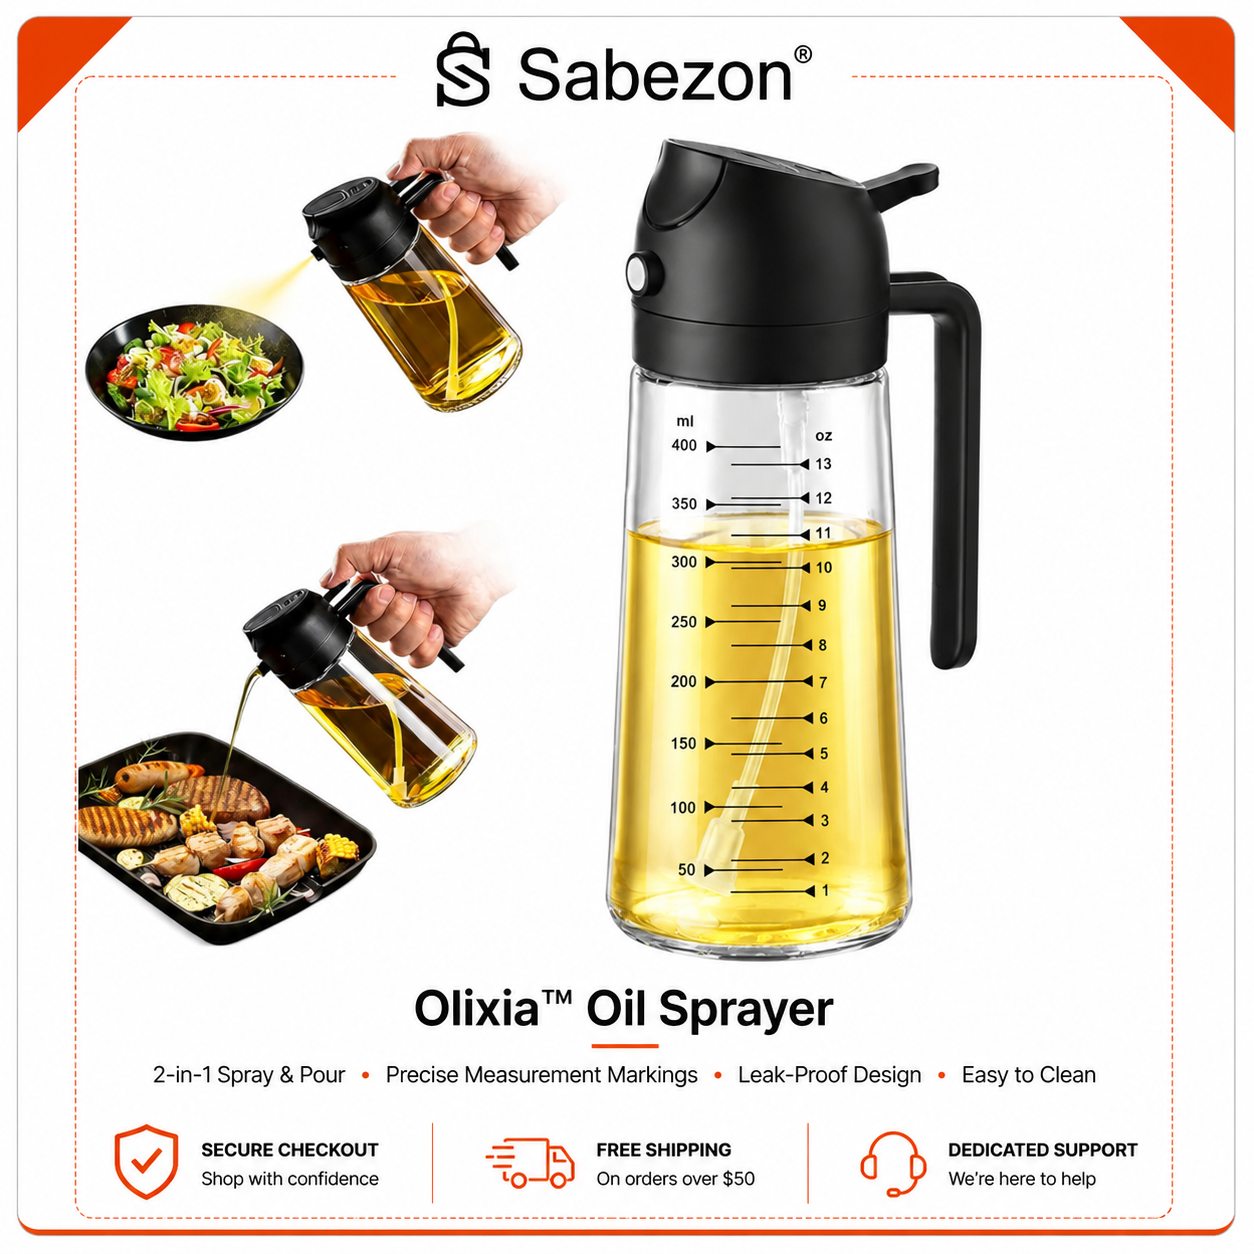


A refillable glass oil sprayer with a reliable pump or trigger gives you the best mix of an even mist, easy cleaning, and oil that stays fresh longer. This sprayer fits that profile with a wide mouth and simple design. Whatever sprayer you choose, keep it away from open flames and rinse it after every use.
TL;DR:
- Refillable glass sprayers with wide mouths and reliable pumps help prevent clogging and keep oil fresh longer, especially when used with refined oils.
- Shake and prime the sprayer before each use, hold it 6 to 12 inches from the surface, and spray in short bursts to ensure even coverage.
- Clean the sprayer routinely by rinsing with warm, soapy water after every use and deep cleaning weekly to avoid buildup and clogs.
- Store sprayers upright in a cool, dark place away from heat or sunlight to prevent oil spoilage and nozzle blockages.
- Choosing oils like refined grapeseed, sunflower, or avocado can improve spray performance, while using dark glass bottles extends oil freshness through light protection.
Not every sprayer works the same way, and picking the wrong type for your kitchen habits leads to clogs and frustration.
Refillable types need periodic cleaning to avoid clogging, especially with thicker oils. Aerosol cans skip that maintenance step entirely but cannot be refilled or reused. For air fryer baskets and finishing touches, a fine, controlled mist matters most. For grilling or big roasting jobs, a wider fan pattern saves time.
Getting a smooth, even coat starts before you ever press the trigger.
The right sprayer should be easy to fill, easy to clean, and built to protect the oil inside it.
Pro Tip: Pick a sprayer with a removable nozzle head so you can rinse every part that touches oil, not just the outside of the bottle.
A little routine care keeps your sprayer working like new.
Weak or sputtering sprays are usually caused by a clogged nozzle rather than a broken pump, according to manufacturer troubleshooting guidance for pump-style sprayers. Store the sprayer upright in a cool, dark cabinet rather than near the stove, where heat encourages oil to solidify inside the nozzle.
Not every oil is a great fit for a fine mist, and how you store the bottle matters as much as which oil you pour into it.
Oil that has gone rancid often smells sharp or “off” before it looks any different, a sensory check worth doing before every use, especially with a bottle you refill often per USDA ARS oxidation guidance.
Keep this nearby for fast fixes when a spray session does not go as planned.
Different oils bring different strengths and headaches to a refillable sprayer. Olive oil, especially extra-virgin, has rich flavor and works well for finishing, but its thicker texture can clog fine nozzles built for a light mist, and America’s Test Kitchen found nozzle design has more to do with spray quality than the oil itself.
Vegetable oil is thin and flows easily through most nozzles, which makes it a dependable everyday choice for air fryer and roasting tasks. It lacks the flavor of olive oil, so it suits recipes where a neutral taste matters more than character.
Avocado oil sits in between: it sprays reasonably well when refined, and its higher smoke point makes it a solid pick for grilling and high-heat roasting. Refining strips some of the stronger avocado flavor, which is a fair tradeoff for smoother spraying.
The real advantage of refilling with any of these oils is control. You choose exactly what goes into your food, with no propellants or additives. The disadvantage is upkeep: thicker oils demand more frequent cleaning, and any oil left sitting too long in a bottle exposed to light or heat will degrade faster than one used up quickly.

The two options solve the same problem in very different ways. Aerosol cans deliver a fine, consistent mist instantly, with no priming and no cleaning, because propellants and additives like lecithin do the work of atomizing the oil, a distinction America’s Test Kitchen confirmed when comparing the two formats. That convenience comes at the cost of ongoing purchases and cans that cannot be refilled once empty.

Refillable sprayers ask a little more of you. You fill them, prime them, and rinse them after use. In exchange, you control exactly which oil goes in, you avoid the additives found in most aerosol sprays, and you are not buying a new can every few weeks. Refillable misters generally cannot match the aerosol’s ultra-fine, consistent mist, so if you need one identical spray pattern every single time, an aerosol may outperform a manual pump.
For most home cooks who cook daily and care about ingredient control, a refillable sprayer pays for itself quickly and cuts down on repeat purchases. For someone who cooks occasionally and wants zero setup, an aerosol can remain a reasonable convenience trade.
A refillable sprayer already cuts down on packaging waste compared to buying aerosol cans week after week, since one bottle can last for months or years with basic care. Choosing glass over plastic reduces the amount of plastic that eventually ends up in a landfill, and it holds up better to repeated washing without breaking down or leaching flavor.
When it is time to retire a sprayer, check whether the glass body and any metal parts can go in your regular recycling stream. Plastic heads and pumps are often not recyclable through curbside programs, so separating parts before disposal helps more of the sprayer avoid the trash. If only the nozzle has failed, replacing just that part instead of the whole unit keeps more material out of the waste stream.
Buying oil in bulk and refilling your sprayer from a larger container, rather than repeatedly purchasing small specialty bottles, also cuts down on packaging waste over time. Simple habits like these, paired with freshness and rotation practices for using up oil before it turns, keep both your kitchen and your footprint a little lighter.
Where you keep your sprayer between uses matters almost as much as how you clean it. Store it upright, away from the stove and any direct heat source, since warmth encourages oil residue to thicken and clog the nozzle over time.
Keep it out of direct sunlight when possible, even if the bottle is tinted glass, since prolonged light exposure still contributes to oil breakdown inside the container. A cabinet shelf or a spot in the pantry works better than a spot next to a sunny window.
If you are not using the sprayer for an extended stretch, empty it, rinse it thoroughly, and let every part dry completely before you put it away. Storing a sprayer with old oil still inside invites both clogging and rancid smells the next time you reach for it. A quick rinse and a dry cabinet shelf are all it takes to keep a good sprayer working for years.
A glass sprayer that is easy to clean beats a fancy one you dread washing. Manual priming takes a few extra seconds compared to aerosol, but you gain full control over what goes into your food. That tradeoff is worth it for daily cooking.
— Tony
Everything in this guide points toward one simple spec sheet: glass body, wide mouth, easy-to-clean parts, and a reliable spray mechanism. The Olixia™ Oil Sprayer is built around that same checklist, with a 16 ounce glass bottle and a 2-in-1 design that switches between spray and pour without extra parts to lose.

Before you buy any sprayer, check its capacity against how much oil you actually use in a week, and confirm replacement heads are available in case a nozzle wears out down the road. Smart Products. Zero Hassle. If you want a sprayer that is simple to fill, simple to clean, and built to last, check out the Olixia™ product page and see if it fits your kitchen.
This guide draws on America’s Test Kitchen’s mister testing, Serious Eats dispenser reviews, USDA ARS oxidation research, FDA food-contact guidance, and manufacturer manual instructions.
Fill it through the wide mouth, prime it with several pumps until oil reaches the nozzle, then hold it 6 to 12 inches from your food and spray in short bursts. Rinse the nozzle after each use to prevent clogging.
Fill, prime with a few test pumps over the sink, then spray your food in short, even bursts rather than one long stream. Adjust distance depending on whether you want a light finishing mist or a heavier coat for roasting.
There is no fixed drop count. Fill the reservoir to the level marked on the bottle or to roughly two-thirds full so there is room for air pressure to build during pumping.
The best type for most home cooks is a refillable glass sprayer with a wide mouth and a reliable pump or trigger, since glass protects the oil from light and cleans up easily. The Olixia™ Oil Sprayer is built to this same standard with a 16 ounce glass body and 2-in-1 spray and pour design.