Cart
0
Complete Your Setup





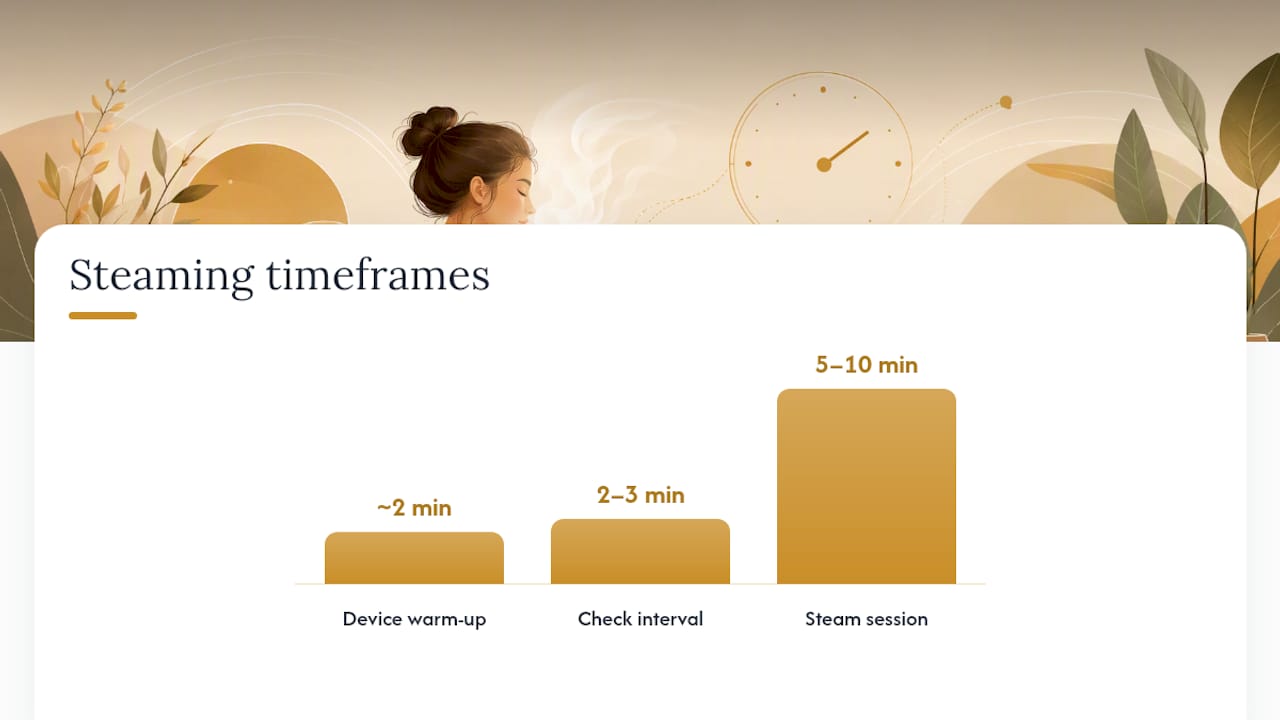
Cleanse your face, steam for 5 to 10 minutes with distilled water at a safe distance, then hydrate right away. That is the whole routine. Let your steamer warm up until the mist runs steady, sit about 6 to 10 inches from the nozzle, and stop immediately if your skin starts to sting or feel too hot.
TL;DR:
- Use only distilled water to prevent mineral buildup inside the steamer and ensure consistent steam quality.
- Limit steaming sessions to 5 to 10 minutes, checking every 2 to 3 minutes for discomfort or excessive heat.
- Avoid steaming immediately after applying retinoids or strong acids to reduce the risk of irritation and barrier damage.
- Clean the steamer regularly by emptying the reservoir after each use and descaling monthly with vinegar to prevent bacterial growth and mineral deposits.
- Prioritize aftercare by applying hydrating serums and moisturizers immediately after steaming, while avoiding active ingredients like retinol or acids on the same day.
Getting this right comes down to sequence. Skip a step and you either waste the steam or irritate your skin. Here’s the order that works every time.
If you don’t own a steamer yet, the bowl-and-towel method gets you a similar result with equipment you already have. Boil water, pour it into a heatproof bowl, and let it sit for a minute or two so it’s not violently hot. Sit with your face roughly 10 to 12 inches above the bowl and drape a towel loosely over your head and the bowl to trap the vapor. Leave a small gap for airflow so heat doesn’t concentrate. This method is harder to control than a device with a steady output, so check in more often and keep sessions shorter than you would with a dedicated steamer.
A note on add-ins: dropping chamomile, herbs, or a few drops of essential oil into the water is popular, but skip it if you have sensitive or reactive skin. Inhaled essential oil vapor can trigger irritation or a respiratory reaction in some people, and it adds a variable you don’t need while you’re still learning your skin’s tolerance. If you want the aromatherapy effect, add it after you’ve done a few plain-water sessions and know how your skin reacts to steam alone.
The prep work matters as much as the steaming itself. A few small choices upfront determine whether your session helps your skin or irritates it.
Distance and attention are what separate a relaxing skincare step from an accidental burn. Start farther from the nozzle than you think you need to, then inch closer only if your skin feels comfortable after a minute or two.
Watch for specific sensations, not just general discomfort. Tightness, stinging, or a hot, prickling feeling are your cue to pull back or stop entirely. Cleveland Clinic points to comfort as the main signal to follow, more than any fixed timer. Your skin will tell you what it can handle faster than a clock will.
Break the session into short checks rather than one uninterrupted stretch. Step back every 2 to 3 minutes, breathe normal air, and touch your cheek lightly to gauge heat and moisture. If you’re using the bowl method, this also gives condensation a chance to drip away instead of pooling under your chin.
Keep your eyes closed throughout, and breathe at a normal pace. If the steam feels thick enough to make breathing uncomfortable, back away and let it disperse for a few seconds.
Pro Tip: If you want to work in a light massage, do it after your skin has been steaming for a minute or two and feels warm to the touch. Use clean fingertips in small upward circles along your jaw and cheeks. Never massage through a stinging or burning sensation. That’s your skin asking you to stop, not push harder.
Your skin is at its most receptive in the minutes right after steaming, which makes the next few steps count more than usual. Rinse with lukewarm water rather than cold or hot, both of which can shock skin that’s just been warmed and softened. Pat dry with a clean towel. Do not rub, since freshly steamed skin is more sensitive to friction than usual.
From there, layer product in this order:
Think of the steam as the setup and your aftercare as the payoff. Skipping toner and serum after a session is like preheating an oven and never putting the food in.
Frequency depends on how your skin actually behaves, not a one-size-fits-all schedule. Oily and combination skin tend to tolerate steaming two to three times a week, since extra oil production helps buffer against dryness. Dry and sensitive skin does better with once a week or even every other week, since steam draws out moisture that these skin types have less of to spare.
If you have rosacea, active eczema, or any inflammatory skin condition, skip facial steaming altogether or check with a dermatologist first. WebMD flags these conditions specifically because heat can trigger flare-ups rather than calm skin down.
Watch for these signs that you’re overdoing it:
If any of these show up, cut your frequency in half and reassess. Skin adjusts, but it needs recovery time between sessions just like any other habit you’re building into a routine.
A steamer that isn’t cleaned regularly turns into a source of mineral buildup and, eventually, bacteria in standing water. Keep it running well with a few simple habits.
I’ve spent years watching how people actually use home gadgets, not how the manual says they should. With facial steamers, the gap between “used correctly” and “used until something goes wrong” is smaller than most people realize. That gap is exactly what shaped how Sabezon approaches this category.
The Calira™ Facial Steamer reflects lessons Sabezon has carried over from building other steam-based tools, including the SteamPilot™ cleaner, where consistent output and easy maintenance matter just as much as raw performance. When you’re shopping for any facial steamer, prioritize auto shutoff, steady steam rather than sputtering bursts, and a reservoir you can actually clean without disassembling half the unit.
Most advice on facial steaming treats it like a spa luxury with vague, feel-good instructions: “steam until relaxed.” That framing undersells what’s actually a simple, mechanical skincare step with real variables, distance, water quality, timing, that determine whether it helps or backfires.
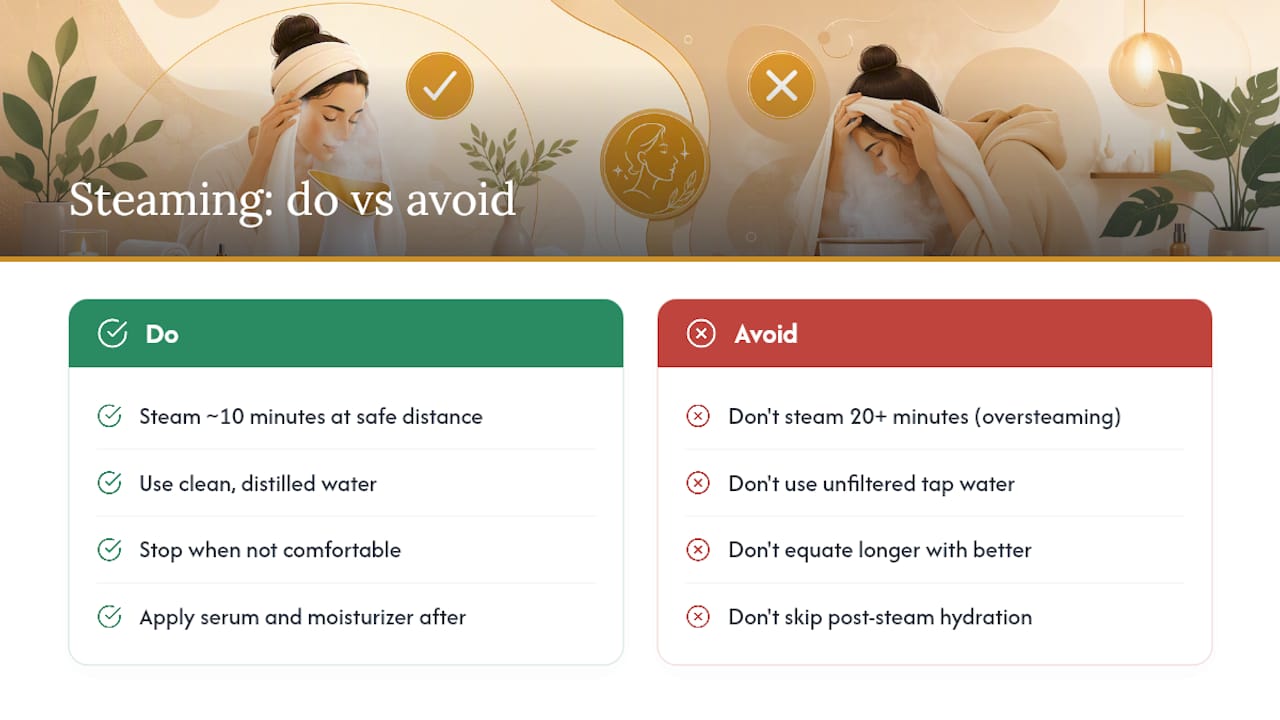
The conventional wisdom I’d push back on hardest is the idea that longer sessions equal better results. They don’t. Ten minutes at a safe distance with clean, distilled water outperforms twenty minutes of oversteaming that leaves your skin stripped and reactive. Comfort, not duration, is the metric that matters, and that’s a harder sell than a dramatic before-and-after photo.
If I had to tell someone what to prioritize first, it wouldn’t be the fanciest device or the trendiest herbal add-in. It’s the aftercare. Steaming without a serum and moisturizer afterward is like opening a window and never closing it again. You lose the hydration benefit the second your skin dries out unprotected. Get that sequence right before you worry about anything else.
— Tony
Following every step above is easier when your device does the hard part for you. The Calira™ Facial Steamer from Sabezon is built around the exact safety habits this guide walks through: it requires distilled water, includes auto shutoff so you’re never guessing when to stop, and produces steady steam output instead of the hot, uneven bursts that cause most steaming mistakes.

You get adjustable distance control, a reservoir that’s simple to empty and dry after each session, and a design built for the exact 5 to 10 minute routine outlined here. No workarounds, no bowl of hot water balanced precariously on a counter. Check out the Calira™ Facial Steamer or browse the full smart home tech collection to find the setup that fits your routine.
Cleveland Clinic covers comfort-based safety cues. Healthline details distance and timing. WebMD explains who should skip steaming. Dr. Dennis Gross offers device-specific setup tips.