Cart
0
Complete Your Setup



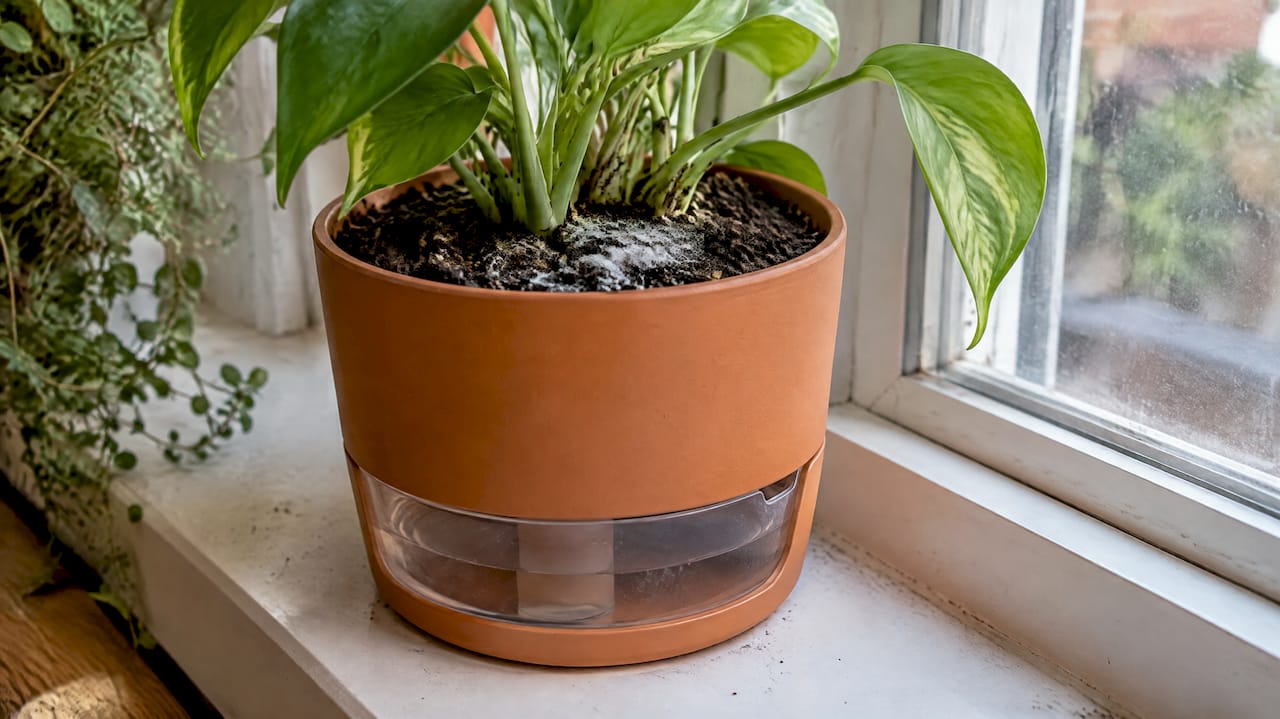
Most mold and mushrooms in a self-watering planter are saprotrophic: they feed on decaying organic matter in the potting mix, not on your living plant. They are a sign of soil that has stayed wet too long, not a plant disease. The first move is simple: remove the visible growth, let the soil surface dry, and check your watering setup. If your plant looks weak or wilted despite the mold, pull the root ball and inspect for rot.
TL;DR:
- Most surface fungi and yellow mushrooms feed on decaying mix, but fuzzy gray growth on stems or leaves may be Botrytis that attacks living tissue.
- Remove visible growth, scrape away 1 to 2 inches of soil if growth is widespread or recurring, improve airflow, and partially refill the reservoir.
- If the reservoir does not draw down within about two weeks, its capacity may exceed the plant’s demand; use partial fills and track levels weekly.
- Leafy greens, tomatoes, peppers, pothos, and peace lilies suit steady moisture, while rosemary, thyme, and most succulents face greater root rot risk.
- When a moldy plant wilts or yellows, inspect roots: firm white or tan roots are healthy; mushy dark roots need trimming and fresh mix.
Not every white fuzz or yellow blob in your planter means trouble. Most are cosmetic, and a few deserve a closer look.
These fungi thrive in warm, humid conditions, typically between 59°F and 80°F. That range covers most indoor rooms, which is why self-watering planters see these visitors more often than planters watered from above and allowed to dry between waterings.
Gray mold is the one exception worth watching closely. It thrives at 60-70°F and relative humidity above 85%, and it can spread to living tissue instead of just decaying matter. If you see fuzzy gray growth climbing a stem or spreading across leaves, treat it differently than a yellow mushroom poking through the soil.
Self-watering planters work by keeping a water reservoir at the base, with either a wick or a direct soil column pulling moisture upward as the plant needs it. That design is the whole appeal, but it is also why mold shows up more in these containers than in a standard pot.
Wick systems draw water slowly and steadily, matching a lower, gentler pace to the plant’s demand. Reservoir-based sub-irrigation systems can move water faster and hold a larger supply, which works well for thirsty plants but keeps the soil consistently damp for anything that prefers to dry out between drinks, according to UNH Extension.
The real trouble starts when the reservoir is oversized for the plant it is feeding. A reservoir that never drops noticeably over one to two weeks means your plant isn’t using the water fast enough, and the soil above stays saturated the entire time.
A few conditions make this worse:
You don’t need to repot everything or panic over a few mushrooms. Work through these steps in order and most mold problems clear up within a week.
If your plant looks droopy, yellowing, or stunted on top of the mold, it’s worth checking the roots before anything else. Gently lift the root ball and look at the outer roots: firm and white or tan means you’re fine, while mushy, dark brown roots point to rot, according to IFAS. Trim away any rotted roots with clean scissors and repot into fresh mix if more than a small portion is affected.
Pro Tip: A mild detergent spray, about one tablespoon of liquid detergent per gallon of water, will break down stubborn slime mold mats that don’t respond to scraping alone, per Mississippi State Extension.

Fixing today’s mold is only half the job. The real win is tuning your setup so you’re not scraping soil every other week.
Start with your potting mix. A blend heavy on fine organic debris, compost, or peat holds moisture longer and feeds fungi more readily than a lighter mix. We recommend aiming for a mix with a higher share of coir and perlite, which drains better and resists compaction. Our guide to self-watering planter soil walks through the ratios that work best for most houseplants.
Next, rethink how you fill the reservoir. Instead of topping it off completely every time, try a partial fill and track how fast it empties. If a reservoir doesn’t draw down within about two weeks for a given plant, that’s a sign it’s oversized or your plant’s demand is too low for a full fill, based on general reservoir sizing guidance from NC State Extension. Switching to a partial fill and watching the drawdown rate gives you a real signal instead of guesswork. Our post on choosing the right planter size covers how to match reservoir capacity to plant type.
Build a short maintenance habit around these steps:
Self-watering planters shine with plants that like consistent moisture and struggle with the feast-or-famine cycle of traditional watering. Leafy greens, many tropical houseplants, and fruiting vegetables like tomatoes and peppers tend to do well, since they pull water steadily and rarely sit in soggy soil long enough for problems to start, according to Clemson Extension.
Drought-tolerant plants are a different story. Rosemary, thyme, and most succulents evolved to dry out completely between waterings, and a constantly moist reservoir setup puts them at real risk of root rot.
If you love a borderline plant in a self-watering container, a partial fill, a wick-based setup instead of a full reservoir, or a leaner, fast-draining mix can help it adjust without the constant dampness it wasn’t built for.
A well-designed planter makes prevention easier, and a few habits go a long way once it’s set up. For most common houseplants in our Verdara™ Self-Watering Planter, we suggest starting with a mix close to the coir and perlite ratio outlined in our soil guide, and filling the reservoir about halfway for the first few weeks while you learn how fast your plant draws it down.
Pro Tip: Mark your reservoir fill line with a dry-erase marker so you can track drawdown at a glance without guessing where the water level started.
The “set it and forget it” promise around self-watering planters is mostly true, but it’s not absolute. These systems still need occasional attention, just far less than a traditional pot that dries out every few days. I’ve seen the same pattern play out more than once: a planter does great for months, then mold creeps in after a cold snap pushes the plant indoors near a heat vent, or after someone tops off a reservoir that was already nearly full.
The fix is rarely dramatic. A partial fill instead of a full one, a bit more airflow, and a quick scrape of the topsoil usually solve it within a week. Mold in a self-watering planter is a maintenance checkpoint, not a failure. Run through the checklist above every few weeks, and these systems stay as low-effort as they’re supposed to be.
— Tony
We designed a self-watering planter to make the parts of plant care that cause mold, like guessing reservoir levels or using the wrong soil mix, much easier to get right the first time. A well-sized reservoir and a mix that drains properly go a long way toward keeping your soil surface dry enough to discourage fungal growth.

After setup, we recommend a simple routine: fill the reservoir about halfway, check drawdown weekly, and refresh the top inch of soil every few months. Pair that with our soil guide for mix ratios suited to your plant type. If you’re ready to simplify your watering routine, take a look at the Verdara™ Self-Watering Planter and browse our full Smart Home Tech collection for more practical additions to your space.
Remove visible mold or mushrooms by hand, scrape away the top 1 to 2 inches of affected soil, and let the surface dry out before watering again. Improving airflow and avoiding oversized, constantly full reservoirs prevents most mold from returning, according to University of Illinois Extension.
A basic DIY version uses two stacked containers: the top one holds soil and a wick or tube reaching into a water reservoir in the bottom container. The key is matching reservoir size and wick thickness to your plant’s water demand so the soil doesn’t stay saturated, per UNH Extension.
Drought-tolerant plants like rosemary, thyme, and most succulents struggle in self-watering containers because the constant moisture increases their risk of root rot, according to Clemson Extension. These species do better in traditional pots that dry out fully between waterings.
Check the reservoir level and refill once it drops close to empty rather than topping it off while it’s still partly full. If the reservoir isn’t drawing down at all within about two weeks, the planter may be oversized for that plant, a sign to switch to a partial fill instead of adding more water.
Most surface mold and mushrooms are saprotrophic and stay contained to the moist soil they’re feeding on, so they’re unlikely to spread to other plants on their own. Gray mold (Botrytis) is the exception, since it can affect living plant tissue and spreads more easily in humid, crowded spaces, per NC State Extension.