Cart
0
Complete Your Setup



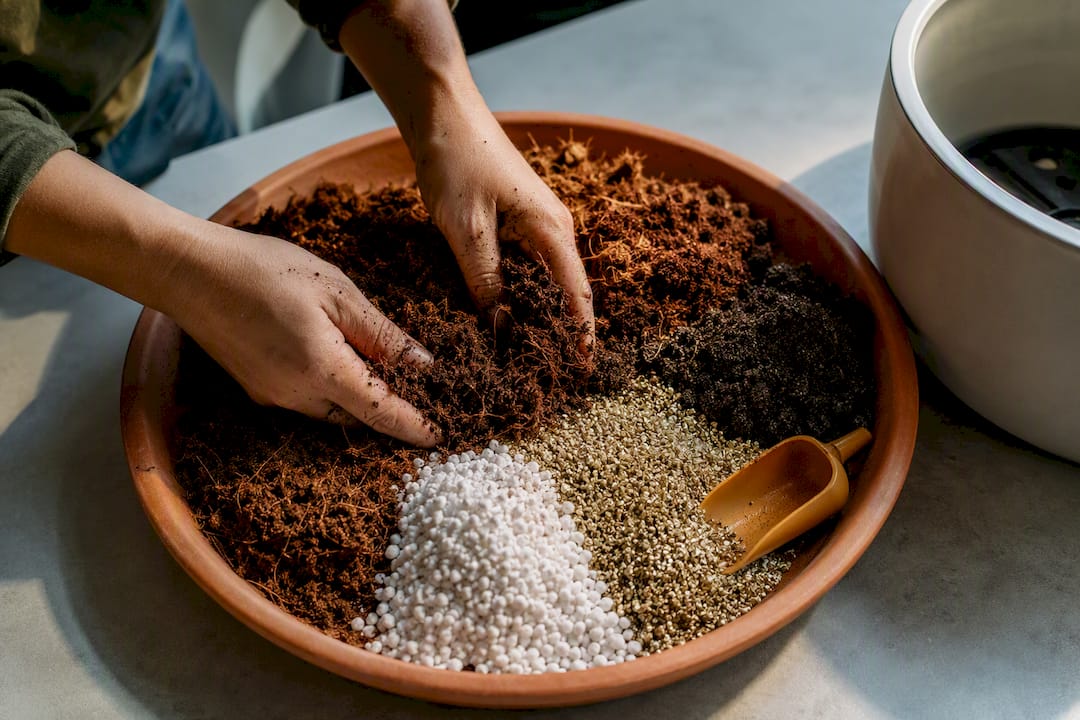
The best soil for a self-watering planter is a lightweight, water-retentive but airy mix, usually peat moss or coconut coir blended with perlite or vermiculite and a modest amount of compost. Skip heavy garden soil and sand; both block the capillary action that pulls water up from the reservoir. Keep the reservoir filled to the overflow line, and top-water the mix once at setup so wicking can start.
TL;DR:
- Use a lightweight, water-retentive soil mix based on peat or coconut coir blended with perlite or vermiculite, avoiding heavy garden soil or sand.
- Choose preblended bags labeled “self-watering” or “wicking,” ensuring they have a light, crumbly texture with visible perlite or vermiculite and appropriate fertilizer content.
- For DIY mix, combine about 40-50% peat or coir, 20-30% compost, and remaining perlite and vermiculite, adjusting for specific plant needs like vegetables or houseplants.
- Proper setup requires pre-moistening the soil, installing the reservoir components with a properly saturated wick, and ensuring the overflow hole is clear to prevent flooding.
- Plants that prefer consistently moist roots, such as leafy greens and tropical houseplants, perform well, while succulents, cacti, and Mediterranean herbs should be avoided in wicking systems.
You don’t always need to build your own mix from scratch. Plenty of bags on the shelf are labeled specifically for this job, and knowing what those labels actually mean saves you a wasted trip.
Look for words like “self-watering,” “wicking,” “moisture control,” or “indoor potting mix” on the bag. These aren’t marketing fluff. They usually signal a soilless blend built from peat or coir, perlite, and vermiculite, the same ingredients that make capillary action work reliably in a reservoir system. If you want an organic option, an “OMRI listed” mix has been vetted against organic standards, which matters if you’re growing food.
Preblended bags have real upsides. You get a consistent texture straight out of the bag, no measuring, no mixing, no guessing whether your ratio is off. For a single indoor pot or a quick patio setup, that convenience is worth paying for. The tradeoff is control. You don’t know exactly how much compost or fertilizer is baked in, and some bagged peat blends arrive partially dried out and hydrophobic, meaning they resist water at first instead of absorbing it.
Preblended mixes make the most sense when you’re filling one or two containers, when portability matters (bagged mix is easier to haul upstairs than a bucket of raw peat and perlite), or when you just want something that works without a learning curve.
Before you buy, run through this quick checklist:
A bag that passes all five checks will wick almost as well as a hand-mixed batch. One that fails two or more is worth skipping, even if the price looks good.
Mixing your own gives you control over cost, nutrient balance, and texture, and it’s not complicated once you know the ratios. Every recipe below starts from the same principle: a base that holds water (peat or coir), a filler that creates air pockets (perlite or vermiculite), and an organic component that feeds the plant (compost or worm castings).
The general-purpose mix works for most containers and most plants. A common DIY guideline calls for 2 parts peat or coir to 1 part perlite and 1 part vermiculite, with compost added for nutrients. That translates to roughly 40 to 50 percent peat or coir, 20 to 30 percent compost, and the remaining 20 to 30 percent split between perlite and vermiculite.
Vegetables need more fuel. Tomatoes, peppers, and leafy greens pull nutrients fast, so a veggie-focused mix leans heavier on compost, up to 40 percent, balanced against 40 percent coir or peat and 20 percent perlite or vermiculite for structure.
Houseplants and herbs want the opposite adjustment. These plants often sit in the same soil for a year or more without repotting, so you want less nutrient load and more longevity. A 50 percent coir or peat, 30 percent compost, 20 percent perlite or vermiculite split works well, and you should scale back added fertilizer if your compost is already nutrient rich.
For larger wicking beds or oversized planters, a coarser recipe holds up better over months. A tested ratio used in wicking bed construction runs roughly 40 percent high-quality compost, 40 percent coconut coir, and 20 percent perlite or vermiculite, which keeps capillary lift strong without collapsing under its own weight.
| Recipe | Peat/Coir | Compost | Perlite/Vermiculite | Best for |
|---|---|---|---|---|
| General-purpose | 40–50% | 20–30% | 20–30% | Mixed containers, first-time setups |
| Vegetable/veggie | 40% | 40% | 20% | Tomatoes, peppers, leafy greens |
| Houseplant/herb | 50% | 30% | 20% | Pothos, philodendron, herbs |
| Large wicking bed | 40% | 40% | 20% | Raised beds, oversized planters |
A few notes worth keeping in mind as you mix:
Every ingredient in a wicking mix has a job. Understanding the job helps you troubleshoot later instead of just guessing at a fix.
Peat moss holds water like a sponge and has been the backbone of potting soil for decades. Its one real flaw: dried-out peat becomes hydrophobic, meaning water beads up and runs off instead of soaking in. When that happens, you need to rewet it deliberately rather than hoping a quick watering will fix it. Peat also runs acidic, so lime is sometimes added to bring pH into a usable range for plants that prefer neutral soil.
Coconut coir does almost the same job as peat with two advantages: it rewets far more easily after drying out, and it’s a byproduct of coconut processing rather than a harvested peatland resource. Coir is increasingly the preferred choice in wicking systems for exactly that rewetting behavior. Depending on how it was processed, some coir needs buffering to remove excess salts before use, so check the packaging for “pre-buffered” or “low-EC” labeling.
Perlite and vermiculite solve different problems even though they get lumped together. Perlite is the white, popcorn-textured mineral that creates air pockets and keeps roots from sitting in soggy, compacted soil. Vermiculite is the flaky, water-holding mineral that boosts moisture retention. A mix leaning too far toward perlite dries out fast; one leaning too far toward vermiculite risks staying soggy. Balance both against how thirsty your plant actually is.
Compost and worm castings feed the microbial life that makes nutrients available to roots. The catch is proportion. Too much compost, especially in a small container, packs down over time and chokes the aeration perlite is supposed to provide.
Wicking materials matter in fabric-based or shelf-style planters that rely on a physical wick rather than direct soil-to-reservoir contact. Strips of felt, cotton rope, or synthetic wicking fabric bridge the water gap. Keep the wick fully saturated at setup, check it periodically for mineral buildup, and replace it if it stiffens or develops a white crust from hard water deposits.
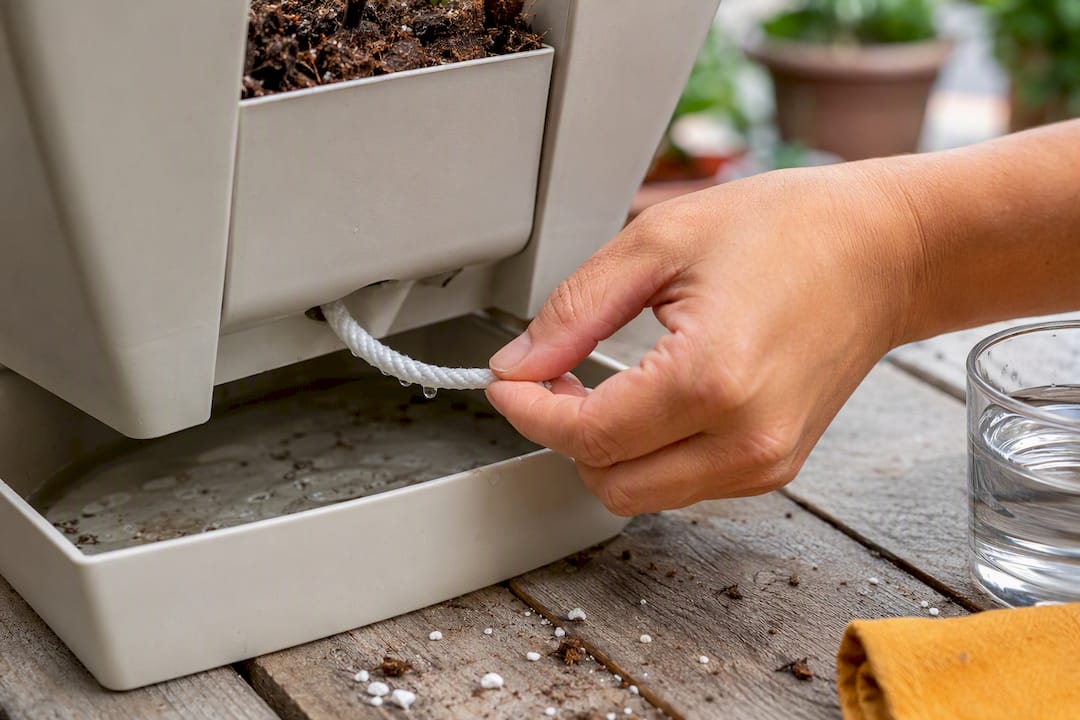
Pro Tip: If your peat-based mix keeps repelling water at the surface, don’t just keep dumping more water on top. Soak the whole rootball in a bucket of warm water with a drop of dish soap acting as a wetting agent, then work coir into future batches so you don’t repeat the problem.
Getting the setup right the first time saves you weeks of uneven watering later. Follow these steps in order, and don’t skip the pre-moistening step, it’s the one most people rush past.
Design matters here too. Fabric-wick planters depend entirely on that wick staying saturated, so check it during your first setup to confirm water is actually climbing through it. Shelf-and-reservoir designs rely on direct soil contact with a raised grid, which usually wicks more evenly across a wider surface but needs a well-packed lower layer to avoid gaps.
One detail that gets overlooked constantly: every reservoir needs a working overflow outlet. Without one, a heavy rain or an overzealous watering session floods the root zone and drowns whatever you planted. Check that the overflow hole is clear before you fill anything.
Not every plant wants constant access to moisture, so matching plant to system matters as much as getting the soil recipe right.
Plants that do well in a wicking setup share one trait: they want consistently moist roots and punish you for letting them dry out. That covers most leafy vegetables like lettuce and basil, along with tomatoes if you give them a deep enough container to support their root system. Tropical houseplants fall into this category too. Pothos, philodendron, and peace lily all tolerate, and often prefer, the steady moisture a reservoir provides over the feast-or-famine cycle of hand watering.
Plants to avoid or handle carefully are the ones that need a dry rest between waterings as part of their natural cycle. Succulents and cacti are the obvious examples; their roots rot quickly in constantly moist soil. Mediterranean herbs like rosemary and thyme evolved in dry, well-drained conditions and tend to sulk or die back in a wicking system. Bulbs that require a dormant dry period are a poor match for the same reason.
Container size changes the equation too. A shallow, narrow planter limits how deep roots can chase moisture, so deep-rooting perennials and larger vegetables need a taller reservoir setup, not just a wider one. When in doubt, size up rather than down.
Most soil complaints in these systems trace back to one of four issues, and each has a fast fix once you know what you’re looking at.
On a maintenance schedule, flush the reservoir every 4 to 8 weeks to prevent mineral buildup and stagnant water, refresh the top 1 to 2 inches of soil once a year to replace compacted material, and follow a feeding rhythm of liquid fertilizer every 2 to 4 weeks or slow-release granules per the label.
The payoff for getting this right is real. A well-designed reservoir setup can stretch refill intervals from daily watering to once every several days or even a few weeks, depending on reservoir size and how thirsty the plant is. That’s the entire point of switching to a wicking system in the first place.
Peat-heavy mixes run acidic, often in the 3.5 to 4.5 pH range straight out of the bag, while most vegetables and houseplants prefer something closer to 6.0 to 6.8. That gap matters more in a self-watering planter than in a regular pot, because the same water sits in contact with the soil for longer, and acidic conditions can lock up nutrients like calcium and magnesium even when they’re present in your compost.
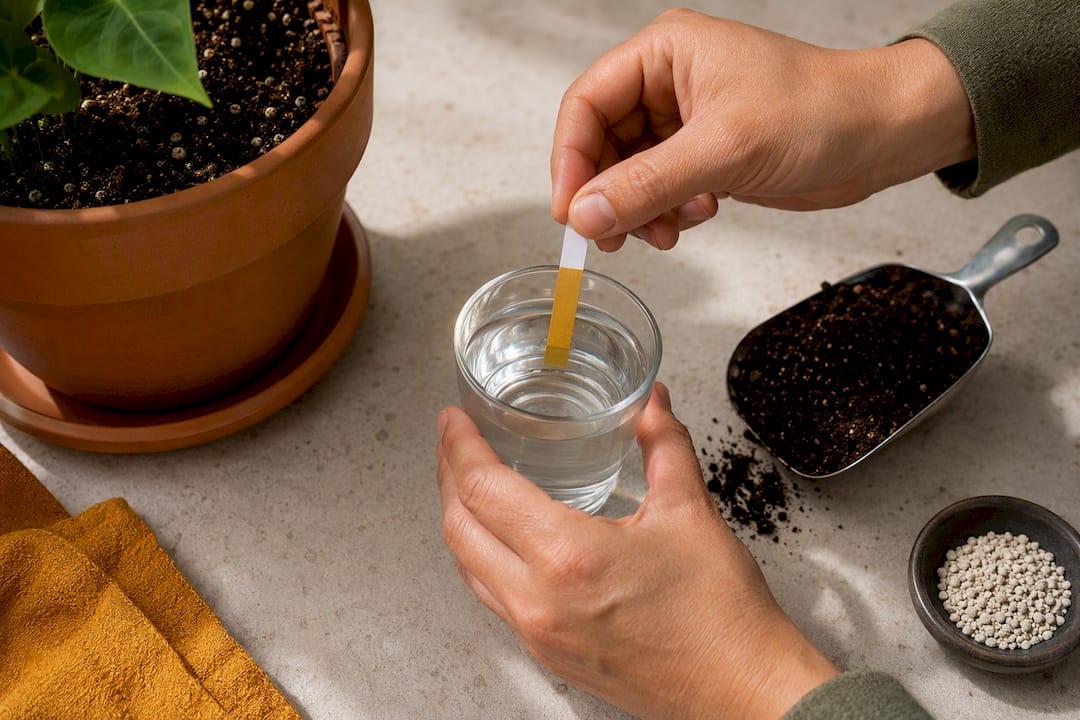
Coconut coir runs closer to neutral on its own, which is one more reason it’s an easier base to work with if you’re not testing pH regularly.
To correct an overly acidic mix, work in a small amount of garden lime, following package rates for container volume rather than guessing. Give it a couple of weeks to adjust before testing again, since lime doesn’t shift pH instantly. If your water source is naturally alkaline (hard well water, for instance), that can push pH the other direction over months of top-ups, so an occasional pH strip test, sold cheaply at most garden centers, is worth the five minutes it takes.
Compost also buffers pH somewhat on its own, which is part of why a balanced mix with 20 to 30 percent compost tends to need fewer corrections than a straight peat and perlite blend.
A wicking system isn’t “set it and forget it” forever. Soil structure breaks down over months, and the balance that worked in spring can shift by midsummer.
Watch the top inch of soil as your gauge. If it stays wet for days after the reservoir was last filled, your mix is holding too much moisture relative to what the plant is using, and you likely need more perlite worked in. If it dries out fast and the plant wilts between refills despite a full reservoir, the wicking contact may have broken down, often because compost has settled and packed against the wick or drain grid.
Seasonal shifts matter too. Hot, dry stretches increase how fast a plant pulls water, so reservoirs will need refilling more often even though the soil mix itself hasn’t changed. Cooler, cloudier weeks slow uptake, and an unchanged watering routine can tip toward waterlogging. Check the reservoir level weekly rather than on a fixed schedule, and adjust based on what you actually see.
Root growth changes the picture as plants mature, too. A young seedling barely touches the wick zone, but a mature tomato plant’s root mass can crowd out air pockets entirely. That’s part of why refreshing the top layer of soil once a season, and checking for compaction near the wick, keeps the whole system working the way it did on day one.
Container soil runs out of nutrients faster than garden soil because there’s no surrounding earth to draw from and constant moisture in a wicking system can leach nutrients toward the reservoir over time.
Compost and worm castings built into your initial mix supply a starting nutrient base, but that supply depletes within a few months for anything actively growing, like vegetables or fast-growing herbs. From there, a liquid fertilizer applied every 2 to 4 weeks keeps nutrients available without overloading the soil in one shot. If you’d rather not measure that often, a slow-release granular fertilizer worked into the topsoil at planting, following the rate on the package, can carry a container for a full season.
Worm castings make a good mid-season top-dress if a plant looks like it’s slowing down, since they release nutrients gently and won’t burn roots the way a strong liquid feed can if overapplied. A light scratch of castings into the top inch of soil every 6 to 8 weeks is usually enough for houseplants and herbs.
One caution: because a self-watering system keeps the root zone consistently moist, over-fertilizing shows up faster than in a pot that dries out between waterings. Salt buildup from fertilizer has nowhere to go once the reservoir stays full, so err on the lighter side and flush the reservoir occasionally to clear excess salts before they accumulate.
Most gardening advice treats self-watering planters like regular pots with a convenience feature bolted on. That’s backwards. The reservoir isn’t a bonus, it’s the whole design constraint, and the soil recipe has to be built around it from the start rather than adjusted after the fact.
The mistake I see repeated constantly is gardeners grabbing whatever potting mix is cheapest at the store and assuming the reservoir will compensate for a soil that’s too dense or too sandy. It won’t. A wicking system amplifies whatever flaw is already in your mix. Compacted soil in a regular pot just drains slowly. Compacted soil in a wicking planter blocks the capillary path entirely, and you end up with a bone dry root zone sitting above a full reservoir, which is the single most confusing failure new users run into.
The other underrated factor is patience with the wick itself. People expect instant results the moment they fill the reservoir, but capillary action needs an unbroken, moist path from water to root. That first top-watering step isn’t optional busywork. It’s what actually starts the system working. Skip it, and you can have a full tank of water sitting uselessly beneath dry soil for days.
Get the mix right and respect the setup sequence, and a self-watering planter genuinely delivers on the low-maintenance promise. Get either wrong, and you’ve just built a more confusing way to underwater your plants.
— Tony
Everything in this guide, the wicking mix ratios, the reservoir setup, the overflow requirement, applies directly to Sabezon’s Verdara™ Self-Watering Planter. It’s built with a reservoir and drain system designed for exactly the peat or coir plus perlite blends covered above, so you’re not guessing whether your DIY mix or preblended bag will actually work with the hardware.

Sizing is where most people get stuck, and it’s worth getting right before you fill anything. Run through this before you buy:
Check Sabezon’s guide on matching planter size to plant needs for exact dimensions, or browse the full Smart Home Tech collection to see how the planter pairs with other everyday home gadgets. Visit the Verdara™ product page now to pick the size that fits your soil depth and plant list.
For deeper technical detail on the ratios and setup steps covered in this guide, these sources are worth a direct read: